Photos & Videos
3.2 - Creating
Activity 1
Green Screen Magic

Green screen technology used to be an expensive tools for professional film-makers. These days all you need is an iPad and a green (or blue!) sheet or even a plain green wall. This activity shows just how easy green screening really is.
Prepare:
- You will need something to act as your green screen. It may be a plain green wall or simply a piece of bright green material hung up in your class. Blue works just as well as green, but avoid other colours. Bold, bright greens or blues works best.
- Decide what your pupils will be discussing in their video. For this example, we're keeping it simple with a factual video about the body, but you can have them create a factual or acting video on just about anything.
- Your school needs a system to get videos off the iPad (or tablet) to save on the server or in the cloud. Recommended options are Google Drive, J2E or OneDrive.
Activity Tasks:
- In pairs or threes, using the Camera app on the iPad, record three or more clips of members of the group discussing their subject. In this example we will record facts about how different organs work.
- Go on the internet on the iPad and use search to find an image to serve as a background for each clip (e.g. images of the organs they are discussing)
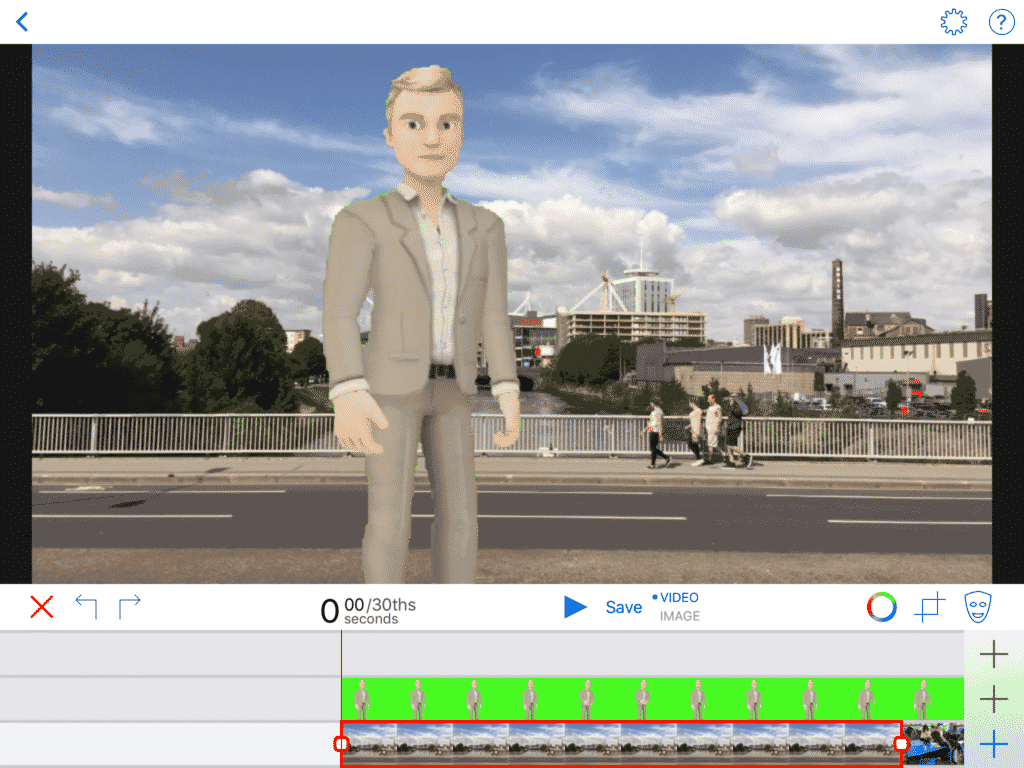
- Open a green screen app (we recommend Green Screen by Do Ink), and insert the first picture as the background.
- Add your first video on top of the image.
- At the end of the video, insert your next image and then the next video on top of that.
- Repeat step 5 for any further clips and images you have.
- Play around with the app's sensitivity settings so that both the background image and the person talking are clear.
- Export the video from the green screen app.
- Import the video to iMovie to add a title and credits (and possibly background music).
- Export the video from iMovie and get it off the iPad.
- Watch the finished videos as a class, discussing what was good about each one and what could be improved.
Remember
- Some schools have invested large sums in professional looking green screens to serve as a background for their videos - but don't bother! A green wall, a piece of fabric or even blue backing paper will do the trick just fine!
- Two all important videoing rules:
- All videoing must be done holding the iPad sideways (landscape). Teach the children never to film in portrait as it only fills a small part of the screen.
- Make sure the cameraman stands close enough to the person talking. iPad microphones are not very strong.
- Save an image from a web search into your camera roll by holding your finger steady on the image and choosing 'Save Image'. This is a vital skill to teach as it's needed for so many iPad based projects.
- Make sure the class get an opportunity to view each other's videos. Videos are made to be shown!
Creating a Green Screen Video
Activity 2
Animation Storytelling
Animation takes a little bit of a back seat in Year 5, with the more complex and time-consuming stop motion making a return in Year 6. This year's simple activity uses a 'puppet' app to tell a story. There are a number of well known apps, and which to choose for your animation depends on its subject matter. For this example we will be telling a story, and for this we recommend the Toontastic app.
Prepare:
- Ensure you have your chosen app installed.
- Teach a story or script writing unit, with 3-5 scenes. Before writing their stories or scripts, show them the characters and settings available in the Toontastic app (there are many of them). Their story or script should use some of those settings and characters.
Activity Tasks:
- Open the Toontastic app (either alone or with a partner).
- Choose the characters and settings for the first scene of your written story / script.
- Record the story or script, using various voices for the characters and dragging them around the screen as they walk and talk.
- Repeat steps 2 and 3 for every scene.
- Export the finished video to the camera roll and then get it off the iPad using your school's usual method.
- Have a cinema hour in class, where they all view each other's stories. (Bring popcorn!)

Remember
- You will need to get the videos from the iPad to your school server or cloud account (OneDrive, GoogleDrive). Life will be much easier for you if, over the first term, you teach the pupils to do this themselves!
Toontastic Puppet Animation Video Guide
Activity 3
Podcast

This third activity is different from all the other KS2 ones because it focuses on sound only, not video or images. The challenge is to create a podcast, with school news, an interview and some music.
Prepare:
- You will need some music for pupils to include in their podcast. Save a few options into a folder on the server or school cloud account. Whilst you must be careful of copyright infringements, you should be OK as long as the podcast aren't played publicly.
- You will need an audio editing app or software. GarageBand works well on iPads and Macs whilst Audacity is a simple, free software that works well on a PC.
Activity Tasks:
- Listen to a few podcasts as a class over the few weeks prior to starting this unit, so that pupils understand the medium. Highlight clips from radio programmes will work best as they are similar to the type you will be creating. (Make sure you check that they're age appropriate beforehand).
- Discuss what the pupils could include in their school podcasts e.g. school news, interviews (with head, teacher, school council member), music, upcoming events.
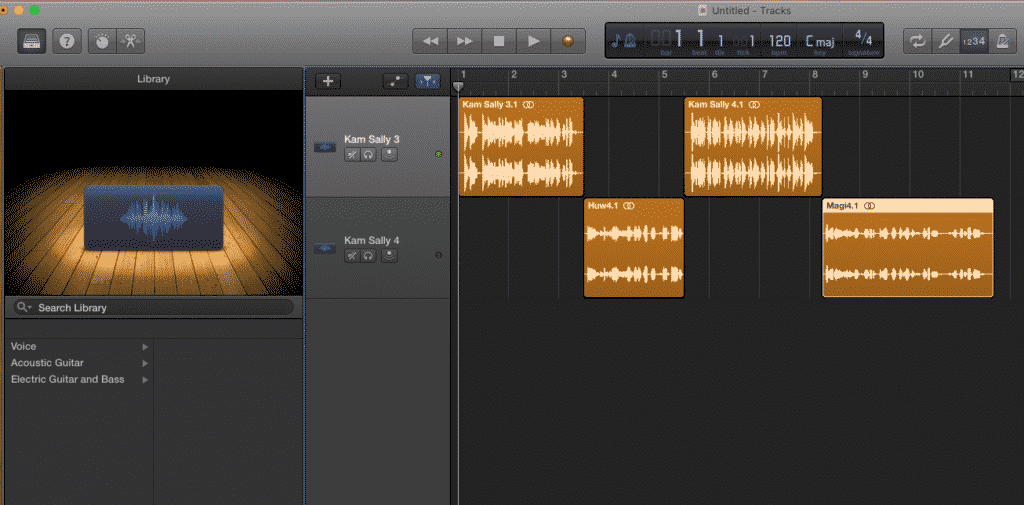
- Practise how to use the software. Show how similar it is to iMovie in that you add or record segments and then drag them around to arrange in the correct order.
- Put the pupils into groups (pairs or threes).
- Each pair can create an intro to the podcast by adding some generic music (GarageBand has clips to choose from) with a voiceover repeating the name of their podcast. Save this as its own file.
- Go and record the interview. It's best to prepare some questions beforehand.
- Select two popular (age appropriate) songs that you want in the podcast.
- Write short scripts for the following segments:
- Welcome link
- News
- Introducing a song
- Introducing an interview
- Discussing upcoming school events
- Introducing a second song
- Goodbye link
- Add the intro music, interview and the two songs into a new project. Record the above segments and arrange in the correct order.
- Save the project and click export as an MP3.
- Play the podcasts in the hall over lunch one week.
Remember
- This is not a quick activity. It will take a few lessons to plan, write scripts and record.
- You could ask local radio hosts to record stings for you to drop in between items. Click below for examples that one school received from Capital Radio and BBC Radio DJ's (some are in Welsh)
Radio Stings Example
Important Note
Share, Share, Share
Now that pupils are becoming confident in creating videos and animations, it's vital that they see their work getting an audience. Here are a few ways to ensure the children feel they worked for a purpose:
- Show the videos in class and discuss feedback.
- This is the most basic type of sharing, and should be done for all completed videos.
- Invite parents/other classes/the Head to a 'Cinema afternoon' watching your completed work. Bring popcorn!
- Upload to a cloud account (One Drive, Google Drive), and send a link to the parents via e-mail.
- Upload to a cloud account (One Drive, Google Drive) and create QR codes to display in class, around the school and in work books. (This is a very simple way of sharing, and you should teach the pupils how it's done, otherwise you'll have to do it 30 times yourself, wasting a lot of time!)
